| 일 | 월 | 화 | 수 | 목 | 금 | 토 |
|---|---|---|---|---|---|---|
| 1 | 2 | 3 | 4 | 5 | 6 | |
| 7 | 8 | 9 | 10 | 11 | 12 | 13 |
| 14 | 15 | 16 | 17 | 18 | 19 | 20 |
| 21 | 22 | 23 | 24 | 25 | 26 | 27 |
| 28 | 29 | 30 | 31 |
- pytorch
- DART
- fastapi를 사용한 파이썬 웹 개발
- ML
- Algorithm
- 영상처리
- Widget
- study book
- 파이토치 트랜스포머를 활용한 자연어 처리와 컴퓨터비전 심층학습
- BAEKJOON
- Stream
- Kaggle
- MATLAB
- llm을 활용 단어장 앱 개발일지
- BOF
- Flutter
- Dreamhack
- ARM
- Got
- BFS
- Image Processing
- rao
- C++
- system hacking
- PCA
- bloc
- MDP
- FastAPI
- 백준
- Computer Architecture
- Today
- Total
Bull
[Flutter::Widget] Bottom Menu Dropdown 만들어보자. 본문

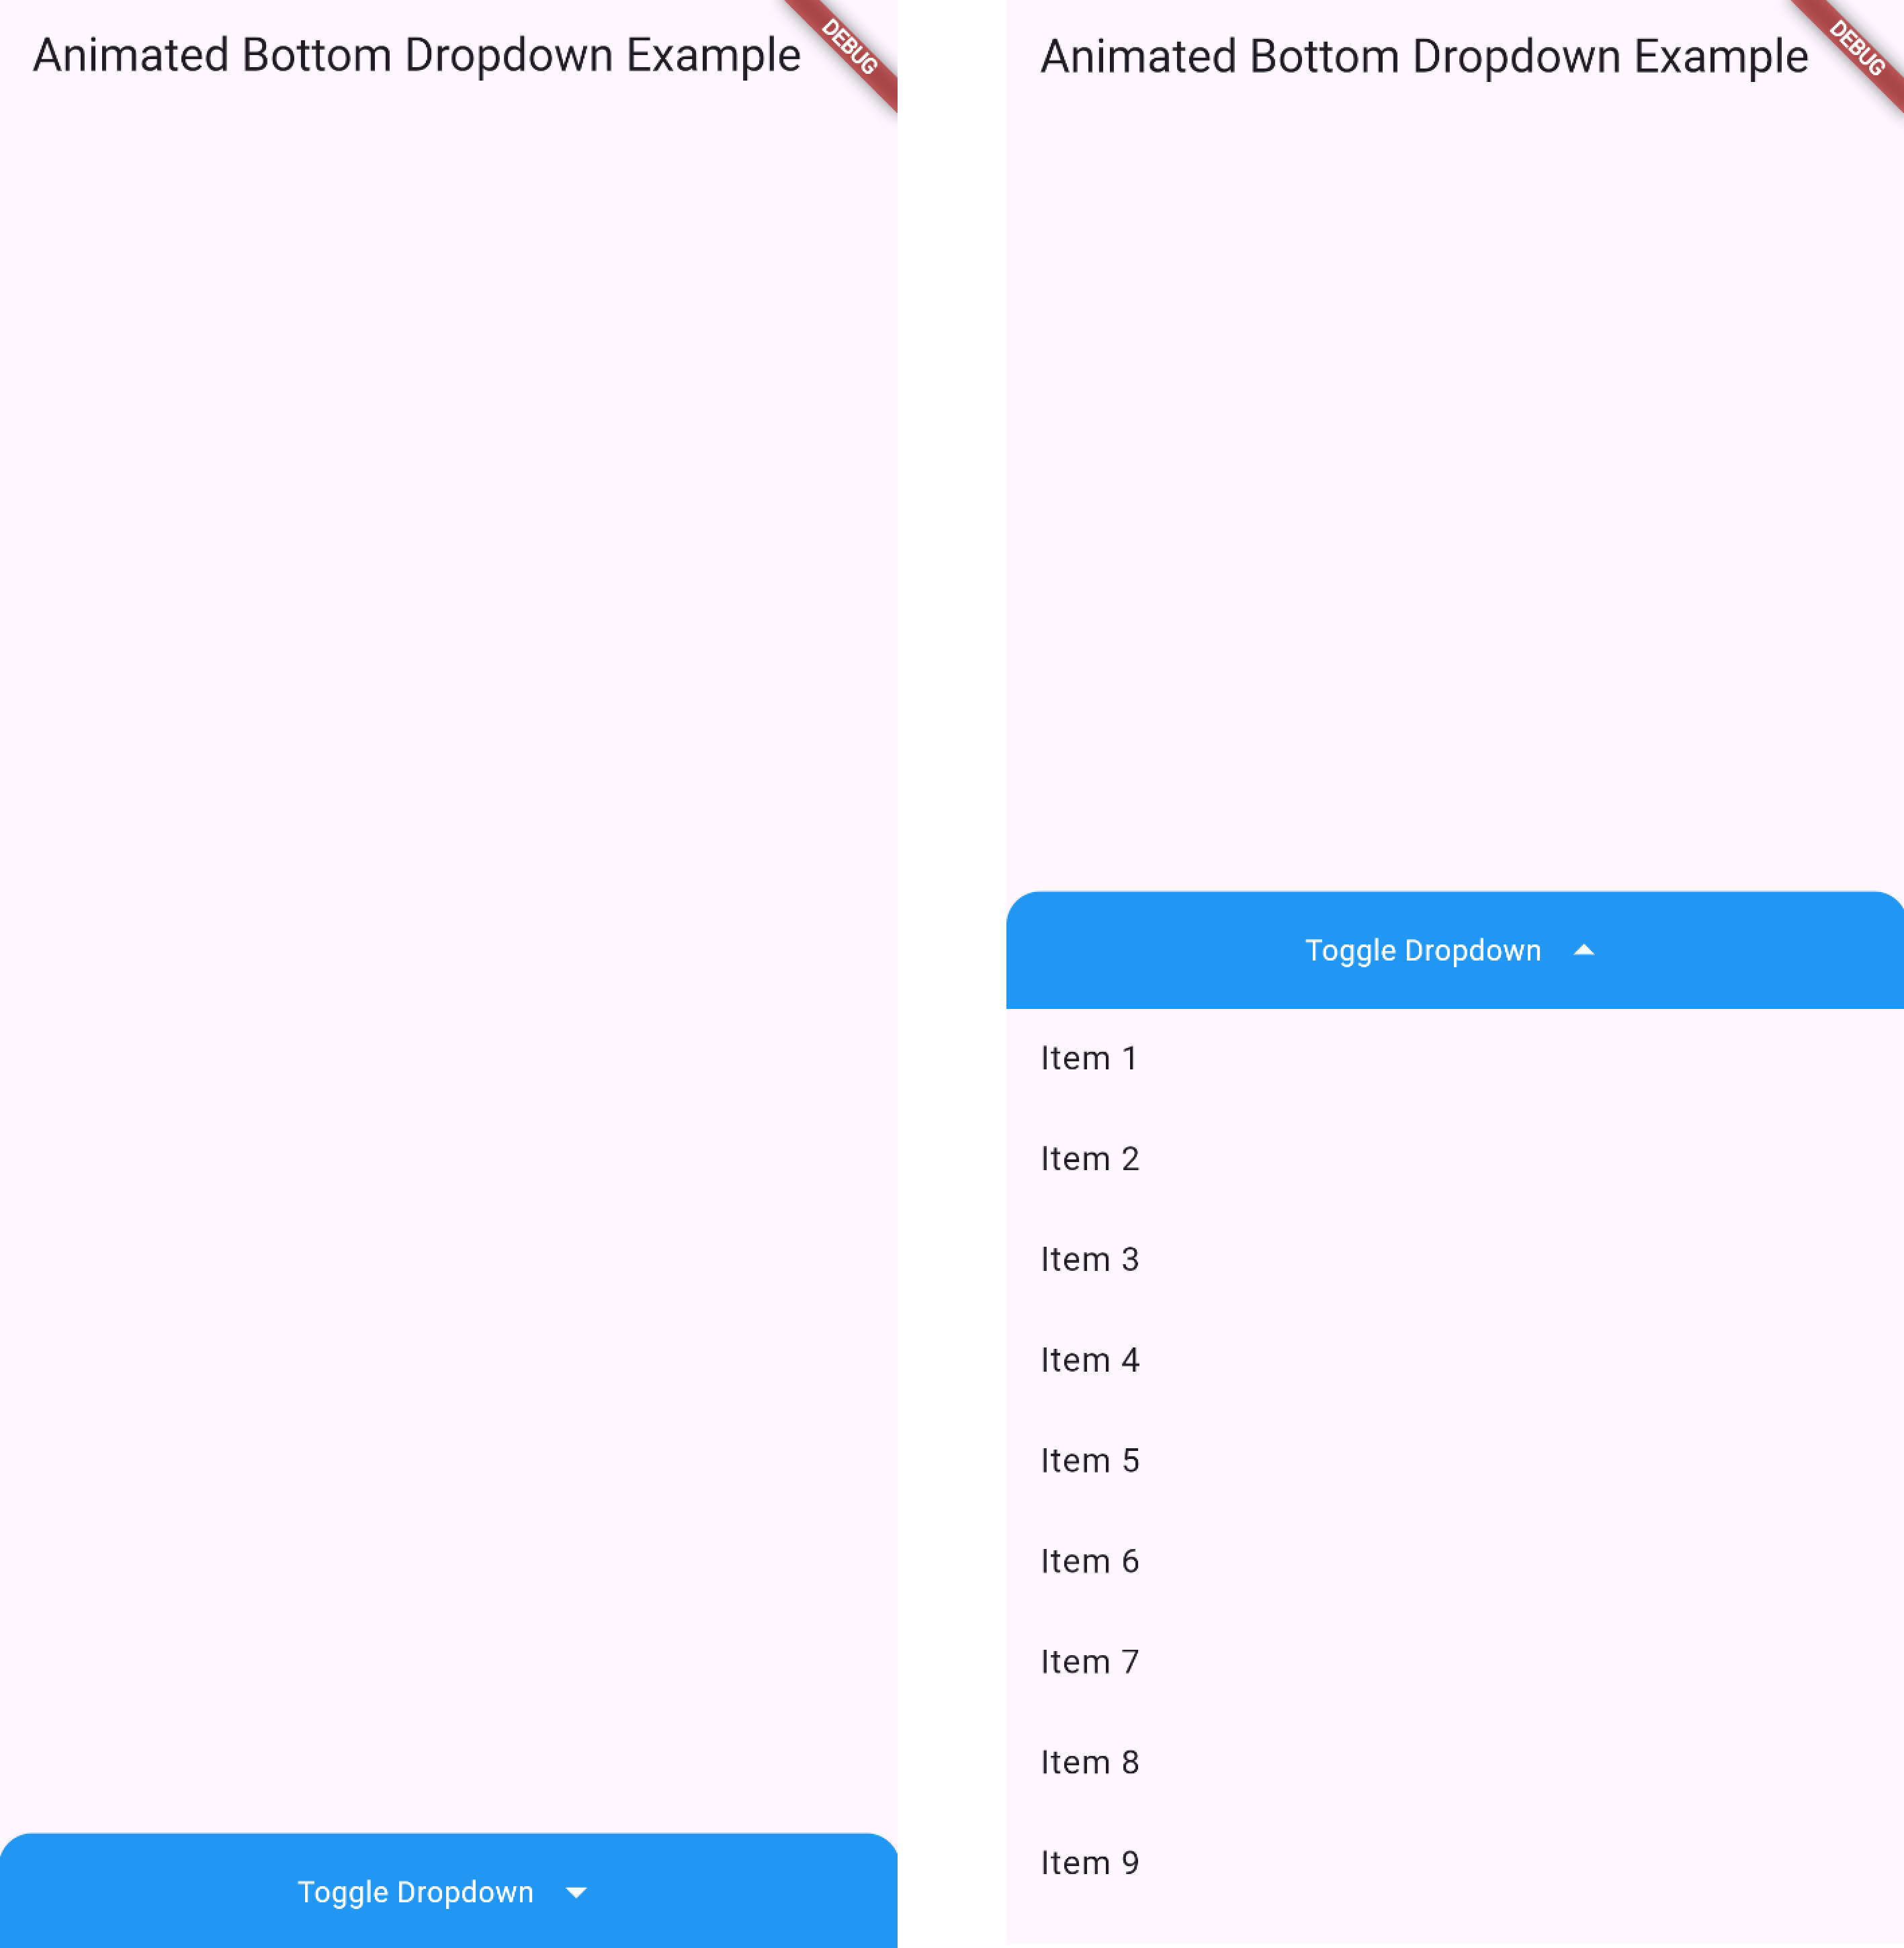
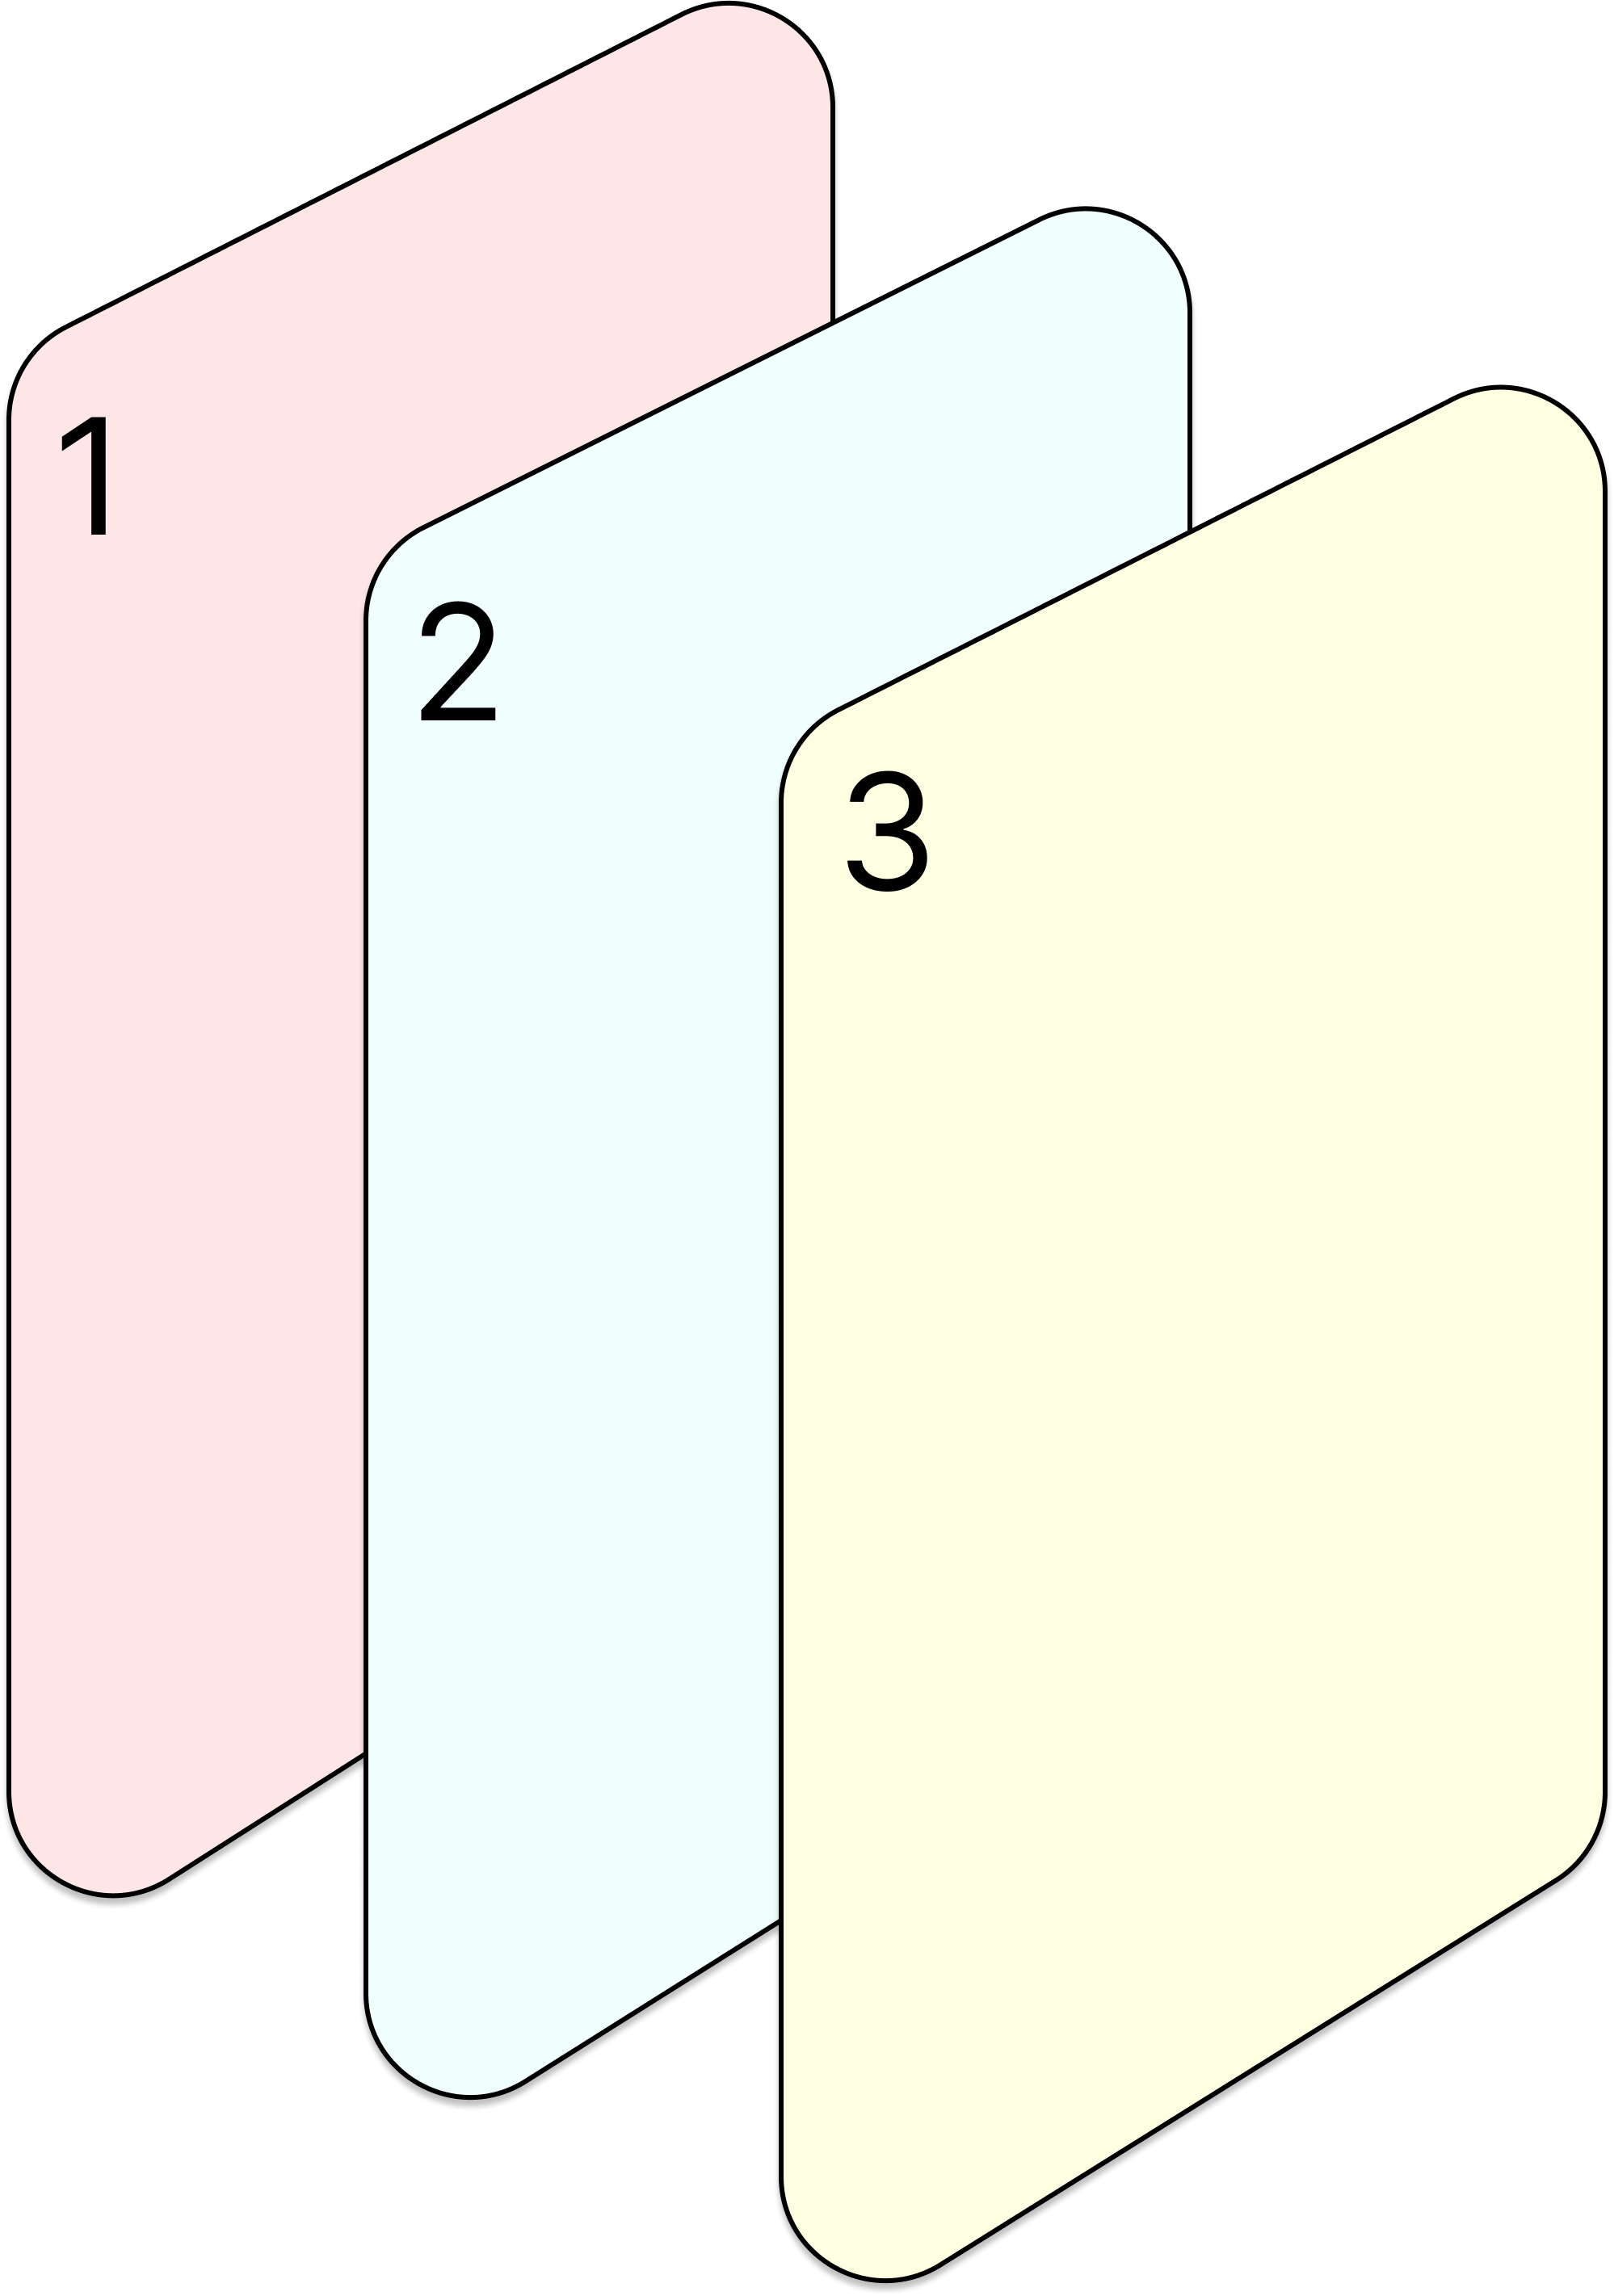
BottomAppBar를 사용하는 대신 아래에 드롭박스를 열어서 아이템을 확인하는 위젯을 만들어 봅시다. 특이사항은 바텀 메뉴가 접혔다가 펼쳤다가 하기 때문에 접혔을 때도 기존의 화면이 나와야 됩니다. 그러기 위해서 Stack 위젯을 사용했습니다. 이 위젯은 렌더링 되는 화면을 3차원 공간으로 인식한 후 stack에 관점에서 겹겹이 위젯을 설치할 수 있습니다.

이제 이 개념을 적용해서 바텀 메뉴 드랍다운을 만들면 아래처럼 됩니다.

그림이 너무 대충만든 것 같죠? 맞습니다. 빠르게 하기 위해서 느낌만 내봤습니다.
그럼 이제 코드를 살펴볼게요.
CODE
import 'package:flutter/material.dart';

void main() {
  runApp(MyApp());
}

class MyApp extends StatefulWidget {
  @override
  _MyAppState createState() => _MyAppState();
}

class _MyAppState extends State<MyApp> with SingleTickerProviderStateMixin {
  bool _isDropdownOpen = false;
  late AnimationController _controller;
  late Animation<double> _iconRotation;

  final double _tileHeight = 50.0;
  final List<String> _items = [
    'Item 1',
    'Item 2',
    'Item 3',
    'Item 4',
    'Item 5',
    'Item 6',
    'Item 7',
    'Item 8',
    'Item 9',
  ];

  @override
  void initState() {
    super.initState();
    _controller = AnimationController(
      duration: const Duration(milliseconds: 300),
      vsync: this,
    );
    _iconRotation = Tween<double>(begin: 0.0, end: 0.5).animate(_controller);
  }

  void _toggleDropdown() {
    setState(() {
      _isDropdownOpen = !_isDropdownOpen;
      if (_isDropdownOpen) {
        _controller.forward();
      } else {
        _controller.reverse();
      }
    });
  }

  @override
  void dispose() {
    _controller.dispose();
    super.dispose();
  }

  @override
  Widget build(BuildContext context) {
    return MaterialApp(
      home: Scaffold(
        appBar: AppBar(title: Text('Animated Bottom Dropdown Example')),
        body: Stack(
          children: <Widget>[
            Center(
              child: Container(),
            ),
            Positioned(
              bottom: 0,
              left: 0,
              right: 0,
              child: Column(
                mainAxisSize: MainAxisSize.min,
                children: <Widget>[
                  GestureDetector(
                    onTap: _toggleDropdown,
                    child: Container(
                      decoration: BoxDecoration(
                        color: Colors.blue,
                        borderRadius: BorderRadius.only(
                          topLeft: Radius.circular(16.0),
                          topRight: Radius.circular(16.0),
                        ),
                      ),
                      padding: EdgeInsets.all(16.0),
                      child: Row(
                        mainAxisAlignment: MainAxisAlignment.center,
                        children: <Widget>[
                          Text(
                            'Toggle Dropdown',
                            style: TextStyle(color: Colors.white),
                          ),
                          SizedBox(width: 8.0),
                          RotationTransition(
                            turns: _iconRotation,
                            child: Icon(
                              Icons.arrow_drop_down,
                              color: Colors.white,
                            ),
                          ),
                        ],
                      ),
                    ),
                  ),
                  AnimatedContainer(
                    duration: Duration(milliseconds: 300),
                    height: _isDropdownOpen
                        ? _items.length * _tileHeight
                        : 0.0,
                    child: SingleChildScrollView(
                      child: Column(
                        children: _items
                            .map((item) => ListTile(title: Text(item)))
                            .toList(),
                      ),
                    ),
                  ),
                ],
              ),
            ),
          ],
        ),
      ),
    );
  }
}
부드러운 느낌을 내기위해 애니메이션을 사용헀습니다.
1. Stack
Stack(
  children: <Widget>[
    Center(
    (... CODE ...)
    ),
    Positioned(
    (... CODE ...)
    ),
  ],
),
스택은 설명하지 않아도 느낌적으로 와닿습니다. Stack의 children 프로퍼티에 먼저 우리가 보는 시야 관점에 가장 뒤쪽이 먼저 와야되고 가장 앞쪽이 뒤부분에 쌓아 주어야 합니다. 마치 스택처럼 말이죠.
Center는 표시해줄 위젯 컨테이너를 적어주면 됩니다. 우리가 봐야할 메인 화면이 되겠죠.
2. Stack - Positioned
Positioned(
  bottom: 0,
  left: 0,
  right: 0,
  child: Column(
    children: <Widget>[
      GestureDetector(
            (... CODE ...)
          ),
          child: Row(
              (... CODE ...)
            children: <Widget>[
              Text(
              (... CODE ...)
              ),
              SizedBox(width: 8.0),
              RotationTransition(
              (... CODE ...)
              ),
            ],
          ),
        ),
      ),
      AnimatedContainer(
        child: SingleChildScrollView(
          child: Column(
            (... CODE ...)
          ),
        ),
      ),
    ],
  ),
),
Positioned 위젯을 이용하여 표현하고자 하는 드롭다운을 제일 하단으로 위치시켰습니다. 이 자식위젯인 Column은 bottom이 0인 부분에 fit하게 됩니다. 그래서 드롭다운을 클릭했을 때 아래서 부터 올라오는 것을 확인할 수 있습니다.
3. Stack - Column - GestureDetector (Button)
GestureDetector(
  onTap: _toggleDropdown,
  child: Container(
    decoration: BoxDecoration(
      color: Colors.blue,
      borderRadius: BorderRadius.only(
        topLeft: Radius.circular(16.0),
        topRight: Radius.circular(16.0),
      ),
    ),
    padding: EdgeInsets.all(16.0),
    child: Row(
      mainAxisAlignment: MainAxisAlignment.center,
      children: <Widget>[
        Text(
          'Toggle Dropdown',
          style: TextStyle(color: Colors.white),
        ),
        SizedBox(width: 8.0),
        RotationTransition(
          turns: _iconRotation,
          child: Icon(
            Icons.arrow_drop_down,
            color: Colors.white,
          ),
        ),
      ],
    ),
  ),
),GestureDetector는 특정 제스쳐를 감지하여 특정 이벤트를 수행할 수 있도록합니다. 이 버튼을 누르면 _toggleDropdown 메소드를 실행하게 됩니다. 나머지는 부분은 디자인이기 때문에 생략하게 하겠습니다. 참고사항은 RotationTransition의 turns 프로퍼티가 되겠습니다.
_iconRotation = Tween<double>(begin: 0.0, end: 0.5).animate(_controller);은 0에서 0.5값을 애니메이션 효과를 주는데 이 turns 프로퍼티는 회전을 얼마나할 것인지 1을 360도를 기준으로 적용합니다. 따라서 눌렀을 떄 180도만 돌아가게 하는 0.5로 조정해주었습니다.
4. Stack - Column - AnimatedContainer (items)
AnimatedContainer(
  duration: Duration(milliseconds: 300),
  height: _isDropdownOpen
      ? _items.length * _tileHeight
      : 0.0,
  child: SingleChildScrollView(
    child: Column(
      children: _items
          .map((item) => ListTile(title: Text(item)))
          .toList(),
    ),
  ),
),
나타낼 아이템을 애니메이션 효과를 추가하여 스르륵 튀어나오게 하기위해 적용해보았습니다. 높이는 기존에 정의한 _tileHeight x 아이템의 개수 만큼 AnimatedContainer 크기를 만듭니다. 이제 이부분에 Column을 통해서 ListTile을 map을 이용해서 풀어주게 되면 끝입니다.
4. _toggleDropdown
  void _toggleDropdown() {
    setState(() {
      _isDropdownOpen = !_isDropdownOpen;
      if (_isDropdownOpen) {
        _controller.forward();
      } else {
        _controller.reverse();
      }
    });
  }
_isDropdownOpen 변수를 사용하여 애니메이션 효과를 컨트롤하기 위한 함수입니다. 크게 설명하지 않겠습니다.
`
'Software Framework > Flutter' 카테고리의 다른 글
| [Flutter] copyWith 메소드의 역할 (0) | 2024.08.06 |
|---|---|
| [Flutter::Window] win32 MessageBox 출력해보기 (Level 1 : 구현) (0) | 2024.07.31 |
| [Flutter::Widget] 채팅 UI를 만들어 봅시다! (0) | 2024.07.25 |
| [Flutter::Animation] Hero 기법 (1) | 2024.07.25 |
| [Flutter::Animation] Fade 기법 (1) | 2024.07.25 |


